参考にさせていただいたページ
今日の環境
プロジェクトディレクトリを作成して移動
ディレクトリ名は何でも良いです。
このあと作成していく設定ファイルの記述内容にも影響しません。
mkdir rails_sample
cd rails_sample
docker-compose.ymlの作成とその記述内容
vim docker-compose.yml
記述内容は以下の通りです。
version: "3.9"
services:
  nginx:
    build: ./nginx
    ports:
      - "8000:8000"
    volumes:
      - ./nginx/nginx.conf:/etc/nginx/nginx.conf
      - ./nginx/html:/var/www/html
      - ./nginx/log:/var/log
    depends_on:
      - app
  https-portal:
    image: steveltn/https-portal:1
    ports:
      - 80:80
      - 443:443
    restart: always
    environment:
      DOMAINS: 'localhost -> http://nginx:8000'
      STAGE: local
    volumes:
      - ./https_portal/ssl_certs:/var/lib/https-portal
    depends_on:
      - nginx
  db:
    image: postgres
    volumes:
      - ./tmp/db:/var/lib/postgresql/data
    environment:
      POSTGRES_PASSWORD: password
  app:
    build: ./rails
    ports:
      - "3000:3000"
    command: bash -c "rm -f tmp/pids/server.pid && bundle exec rails s -p 3000 -b '0.0.0.0'"
    volumes:
      - ./rails:/myapp
    environment:
      - RAILS_SERVE_STATIC_FILES=false
      - RAILS_ENV=development
    depends_on:
      - db
nginxディレクトリ作成
mkdir nginx
nginx用のDockerfileの作成とその記述内容
vim nginx/Dockerfile
記述内容は以下の通りです。
FROM nginx:1.20
nginx/nginx.confの作成とその記述内容
vim nginx/nginx.conf
記述内容は以下の通りです。
user nginx;

events {
  # 1ワーカーの接続数
  # worker_connections 2048;

  # 複数のリクエストを同時に受け付けるか
  multi_accept on;

  # 複数アクセスをさばくためにI/O多重化に使うシステムコールを指定する
  use epoll;
}

http {
  # HTTPレスポンスヘッダのContent_Typeに付与する文字コード
  charset UTF-8;

  # HTTPレスポンスヘッダのServerにnginxのバージョンを入れるか(開発時以外は入れないほうが吉)
  server_tokens off;

  # MIMEタイプと拡張子の関連付けを定義したファイルを読み込む
  include /etc/nginx/mime.types;

  # 上記したmime.typesにマッチしなかった場合の設定
  # octet-streamは任意のバイナリコードを意味し、ブラウザでは実行したりせず、単にダウンロードする挙動をとるらしい
  default_type application/octet-stream;

  # upstreamのpumaを定義
  upstream puma {
    # server service名:3000; のように記述
    server app:3000;
  }

  # web-bonsai.techの設定 (nginx:8000 の設定)
  server {
    # リスニングポート
    listen 8000;

    # ドメイン設定(ローカル環境ではlocalhostで、本番環境ではドメインを設定する。)
    # server_name web-bonsai.tech;
    server_name localhost

    # HTTPレスポンスヘッダのContent_Typeに付与する文字コード
    charset utf-8;

    # logの出力先
    access_log /var/log/nginx/access.log;
    error_log  /var/log/nginx/error.log;

    # ドキュメントルート
    root /var/www/html;

    # location
    location /index.html {
      index index.html;
    }

    # location
    location / {
      #proxy_set_header X-CSRF-Token $http_x_csrf_token;
      #proxy_set_header X-Real-IP $remote_addr;
      proxy_pass http://puma;
      #proxy_set_header X-Forwarded-For $proxy_add_x_forwarded_for;
      proxy_set_header Host $http_host;
      #proxy_set_header X-Forwarded-Proto $scheme;
      proxy_redirect off;
    }
  }
}
nginx/htmlディレクトリを作成
mkdir nginx/html
nginx/html/index.htmlの作成とその記述内容
vim nginx/html/index.html
記述内容は以下の通りです。
web_bonsai index.html
nginx/log/nginxディレクトリの作成
mkdir nginx/log
mkdir nginx/log/nginx
logファイルを空で作成
touch nginx/log/nginx/access.log
touch nginx/log/nginx/error.log
railsディレクトリを作成
mkdir rails
rails用のDockerfileの作成とその記述内容
vim rails/Dockerfile
記述内容は以下の通りです。
FROM ruby:3.1.2

RUN apt-get update -qq && apt-get install -y nodejs postgresql-client vim
WORKDIR /myapp
COPY Gemfile /myapp/Gemfile
COPY Gemfile.lock /myapp/Gemfile.lock
RUN bundle install
COPY . /myapp

# Add a script to be executed every time the container starts.
COPY entrypoint.sh /usr/bin/
RUN chmod +x /usr/bin/entrypoint.sh
ENTRYPOINT ["entrypoint.sh"]
EXPOSE 3000

# Configure the main process to run when running the image
CMD ["rails", "server", "-b", "0.0.0.0"]
rails/Gemfileの作成とその記述内容
vim rails/Gemfile
記述内容は以下の通りです。
source 'https://rubygems.org'
gem 'rails', '~>7'
rails/Gemfile.lockを空で作成
touch rails/Gemfile.lock
entrypoint.shの作成とその記述内容
vim rails/entrypoint.sh
記述内容は以下の通りです。
#!/bin/bash
set -e

# Remove a potentially pre-existing server.pid for Rails.
rm -f /myapp/tmp/pids/server.pid

# Then exec the container's main process (what's set as CMD in the Dockerfile).
exec "$@"
ここまでやった段階でのディレクトリ構造とファイル構成
.
├── docker-compose.yml
├── nginx
│   ├── Dockerfile
│   ├── html
│   │   └── index.html
│   ├── log
│   │   └── nginx
│   │       ├── access.log
│   │       └── error.log
│   └── nginx.conf
└── rails
    ├── Dockerfile
    ├── entrypoint.sh
    ├── Gemfile
    └── Gemfile.lock
rails newする
docker-compose run --rm --no-deps app rails new . --force --database=postgresql
rails newされて、railsのプロジェクトが生成されます。
このときGemfileやGemfile.lockが更新されます。
以下のようなエラーが赤字で出力されました。
         run  bundle binstubs bundler
Could not find gem 'sprockets-rails' in locally installed gems.
       rails  importmap:install
Could not find gem 'sprockets-rails' in locally installed gems.
Run `bundle install` to install missing gems.
       rails  turbo:install stimulus:install
Could not find gem 'sprockets-rails' in locally installed gems.
Run `bundle install` to install missing gems.
bundle installする
以下のコマンドを実行します。
docker-compose run --rm app bundle install
白字なのでエラーではなさそうですが以下のメッセージが表示されました。
RubyZip 3.0 is coming!
**********************

The public API of some Rubyzip classes has been modernized to use named
parameters for optional arguments. Please check your usage of the
following classes:
  * `Zip::File`
  * `Zip::Entry`
  * `Zip::InputStream`
  * `Zip::OutputStream`

Please ensure that your Gemfiles and .gemspecs are suitably restrictive
to avoid an unexpected breakage when 3.0 is released (e.g. ~> 2.3.0).
See https://github.com/rubyzip/rubyzip for details. The Changelog also
lists other enhancements and bugfixes that have been implemented since
version 2.3.0.
docker-compose buildする
参考ページに倣って以下のコマンドを実行します。
docker-compose build
railsのデータベース設定をする
参考ページに倣って、config/database.ymlを以下の通りになるように編集します。
default: &default
  adapter: postgresql
  encoding: unicode
  host: db
  username: postgres
  password: password
  pool: 5

development:
  <<: *default
  database: myapp_development


test:
  <<: *default
  database: myapp_test
たぶんdefaultの host, username, password の項目を追記するだけだと思います。
db createする
参考ページに倣って以下のコマンドを実行します。
docker-compose run --rm app rails db:create
docker-compose upする
参考ページに倣って、以下のコマンドで、各サービスを起動します。
docker-compose up
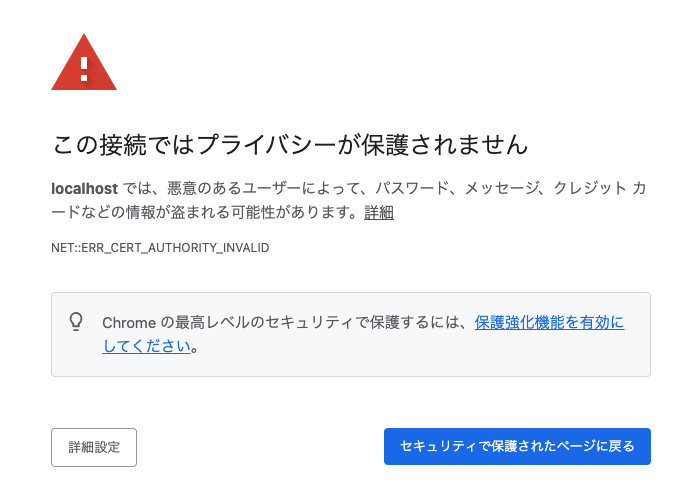
localhostにアクセスしてみる
「https://localhost/」にアクセスすると、証明書が開発環境用なので「この接続ではプライバシーが保護されません」の警告が表示されます。
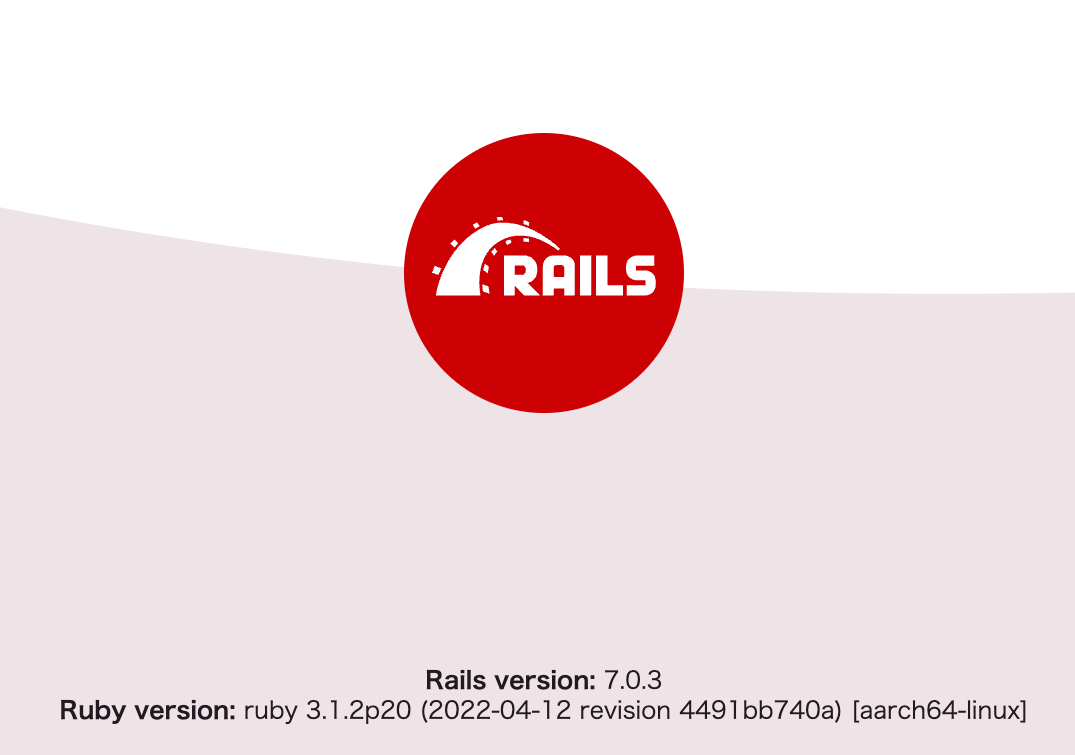
そのままアクセスするとrailsのスタートページが表示されました。
「https://localhost/index.html」にアクセスすると、作成した nginx/html/index.html の内容が表示されました。
これでローカル環境がhttpsで表示できるようになりました。